Get new basic network lesson for beginer.
No other places you can get this lesson.

1) Go to Start and click Control Panel. Control Panel Window will appear, then double click Printers and faxes.
2) Printers and Faxes window will appear. Right click the printer you want to share, then click Sharing…

Note: Make sure you've enabled File and Printer Sharing for Microsoft Networks on network card's properties.

3) Select Sharing tab and tick Share this printer to share the printer. You can type in a new name in the Share name text box to change your printer name on the network, however this will not change the printer name on your computer. Click Apply.

Note: If the other users using different version of Windows to access your printer, they will need to install printer driver themselves. You can help by installing additional printer drivers on your Windows XP, so that the printer driver will be installed when other users access the shared printer with different version of Windows. Click Additional Drivers, tick additional driver you would like to install. You will be prompted to install those additional drivers after clicking OK.

4) Once you have shared the printer, you will see there is a hand supporting your printer.


TCP/IP defines the language that your computer uses to communicate with other computers. We recommend using automated Dynamic Host Configuration Protocol (DHCP) to automatically assign Internet Protocol (IP) addresses to the computers on your network, if your network supports it. If you use DHCP, then you don't have to change your settings if you move your computer to another location, and DHCP doesn't require you to manually configure settings such as Domain Name System (DNS) and Windows Internet Name Service (WINS).
|
| Rank | Title and Description | In | Out |
| 1 | 1080| | 283 | |
| |  Started in 1989, Avalon is the first of its kind. Much imitated, never beaten. It is not a game. It is a life, of dragons, sorcerers, shopkeepers, great cities, wars, princes and gods. Yet only a few rise to become gods themselves. Will you be the next? Avalon is the finest of all online RPG games. | MUDS Previous Online RPG Games Rank: 1 | |
| 2 | 1059| | 544 | |
| | The Star Wars Combine is a free online player-based simulation revolving around the Star Wars universe. Online RPG games genre. | MMORPG Previous Online RPG Games Rank: 3 | |
| 3 | 966| | 222 | |
| | Free web based mafia game, multiplayer, with over 20,000 members. | MMORPG Previous Online RPG Games Rank: 2 | |
| 4 | 695| | 136 | |
| | We are now live! Do you think you have what it takes to take your clan to the top? Are you the best fighter in the land? Think you can amass the biggest fortune? Want to spend some time with mature players over the age of 18? Come join us. | MMORPG Previous Online RPG Games Rank: 4 | |
| 5 | 581| | 316 | |
| | A free fun web based Mafia Crime game. As a Mobster your aim is to work your way to the top, whether by yourself or with the help of your gang. Attack and mug people to gain more money and respect, gamble, deal in weapons and armour. Be a true mobster! | MMORPG Previous Online RPG Games Rank: 5 | |
| 6 | 198| | 95 | |
| | Started in 2006. Since then, it has been through many testing phases and improvment stages to become one of the best MMORPG's today. The aim of the game is to compete for dominance over all other members. | MMORPGs Previous Online RPG Games Rank: 7 | |
| 7 | 171| | 77 | |
| | Vampire themed text based RPG | MMORPGs Previous Online RPG Games Rank: 6 | |
| 8 | 121| | 36 | |
| | Sign up today to become a mobster working your way through the ranks to become the greatest and most powerful gangster in the Mafioso world | MMORPG Previous Online RPG Games Rank: 24 | |
| 9 | 103| | 44 | |
| | Online Mafia World. Online RPG games play. | Browser Based Previous Online RPG Games Rank: 8 | |
| 10 | 102| | 66 | |
| | Looking for a fun and interesting game full of mobsters? Try The Mafia Syndicate, Where you can train your stats, Level, Join gangs, Make friends. | MMORPG Previous Online RPG Games Rank: 10 | |
The first time you create a dial-up connection, you will be prompted for location information. It is important to specify the correct country, and dialing information. The standards for telephone operation differ in various countries. Incorrect country selection may prevent the modem from functioning properly - including dial-tone and call-progress detection. You can reach the screen to create a connection from Start -> Connect To (and click on "Set up a connection or network"), or from Control Panel -> Network and Sharing Center (and click on "Set up a connection or network").
| After you have set the location, you can change and edit it with the Phone & Modem options in Control Panel. You can also create New locations. (Helpful if you have a mobile computer that you use in various locations.) | 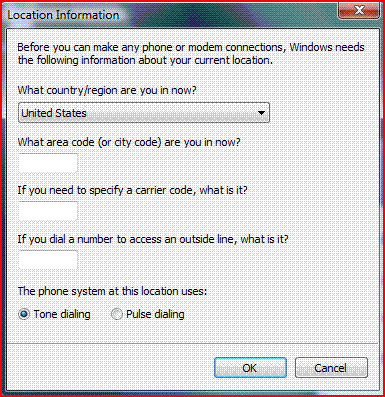 |
| To create a new connection, click on "Set up a dial-up connection" |  |
| Enter the Phone Number (the dialing rules link is important as it will determine whether the number you put in here is actually dialed, or whether modifiers like 1 or area code, or outside line digits are added). You may enter your username and password, or, you can leave them blank and you'll be prompted for them when you attempt to make a connection. You can put a descriptive name in the "Connection name" box. If you check the "allow other people..." box, the connection will be available to all users of your computer; if you leave it unchecked, only your username will have access to it. | 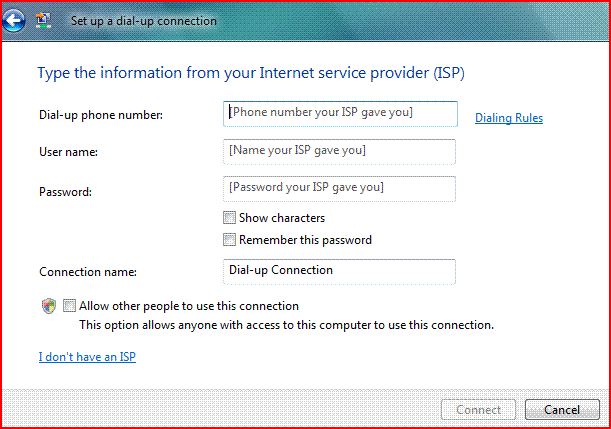 |
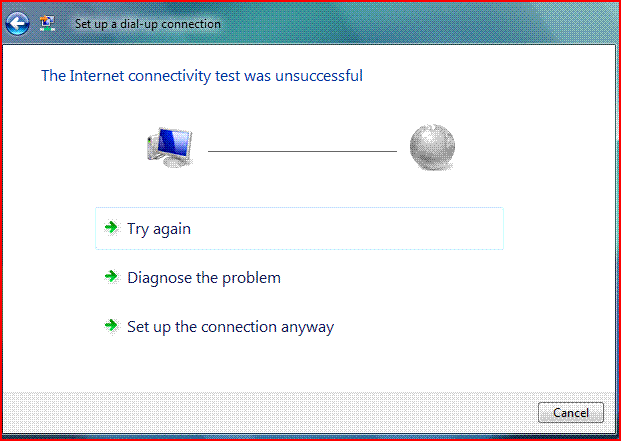
After you have entered a phone number in the "Set up a dial up connection" window as shown above, the "Connect" button becomes clickable. There is no "Save" button - only "Connect" and "Cancel". You must click on "Connect" to save the connection, which will start an attempt to make a connection using the username and password (if any) you entered. This dialog will have a "Skip" button which you can use to skip the connection test. If the connect test fails, you will be shown a window similar to below:
If you select "Try again", Windows will make another attempt to dial the ISP and connect. If you select "Diagnose the problem" you will be presented with a window that says there is no problem. (Apparently, Windows Vista is unable to diagnose any dial-up problems at all - every test I have made results in the problem being diagnosed as no problem.) Or, you can select "Set up the connection anyway", or click "Cancel" which will abort the attempt to set up a dial-up connection.
Once the connection has been set up, you can use it, or edit it.

You can re-enable UAC by selecting the "Enable UAC" line and then clicking on the Launch button.
*Recommended: Speed up Vista boot times by reducing the number of programs that load at startup. Control your Vista startup list with this Vista app
HKEY_LOCAL_MACHINE'Software'Microsoft'Windows'CurrentVersion'Policies'System
Note: As always, before making changes to your registry you should always make sure you have a valid backup. In cases where you're supposed to delete or modify keys or values from the registry it is possible to first export that key or value(s) to a .REG file before performing the changes.
In order to re-enable UAC just change the above value to 1.
This can be done via Local Group Policy or via Active Directory-based GPO, which is much more suited for large networks where one would like to disable UAC for many computers at once.
If using Local Group Policy you'll need to open the Group Policy Editor (Start > Run > gpedit.msc) from your Vista computer.
If using in AD-based GPO, open Group Policy Management Console (Start > Run > gpmc.msc) from a Vista computer that is a member of the domain. In the GPMC window, browse to the required GPO that is linked to the OU or domain where the Vista computers are located, then edit it.


In order to re-enable UAC just select the above checkbox and reboot.