
Hello Guys, quite long i didn't post in my blog. Today wanna
teach you how to reset absorber error. this all what i know is
every canon printer user always can see this error. canon
printer can use only for few thousand papers. absorber error
comes when your printer reach printing limitation.
OK , here is simple step to reset absorber full. if you send to
shop for repair it will cost you USD 10 or RM30 and more for
send to canon. estimate RM50 - RM300.
Step 1 : Press Power button. while pressing power button.
remove power cord(cable).
Step 2: Still pressing Power button and put back power cable.
Step 3: Wait 30 second and release the power button. after
release power button your printer must be in off condition
otherwise you needs to redo step 1 back.
Step 4: turn on the printer. (press power button).
that is it. good luck
Tuesday, December 15, 2009
Friday, October 16, 2009
HOW TO CONNECT WIRELESS (WINDOWS XP)
Sometimes people ask me how to connect wireless using thier laptop. Popular question asked to me is " my wireless connected but i cannot connect to internet, why?"
Here the answer for thease question. wacthout!
1. i'm sure wireless adpater is in good because got connection connected. otherwise need to check adapter 1st. Also check wireless router is connected to internet and DHCP included.
2. Make sure your wireless connected to the Access Point not to AD-Hoc connection.

3. When Click connect it will ask for WEP key or security key. Insert the key. For non secure wireless not asking for key. you can just connect to wireless.
4. With correct key you can connected to network.
Ok, here if you wireless connected but still not getting internet.
1. Make sure wireless router/switch connected to internet. and your Ip correct for this network. normally your ip addess will assign automatically. But if ip address not correct you have to put ip manually and same IP range.
2. This problem sometimes happen if you Ip address crash or same with ther other computer. that means 2 computer connected to this network using same ip address. if this problem out you can just repair you connection or canfigure ip again with other values.
Thank you, please click ads below and register as member.
Saturday, September 12, 2009
Tips To Play Vampire In Warcraft III
Vampire maps most popular in warcraft 3. here i post some tips to new player.for pro player i think this tips also usefull.
IIIIIIIIII Start The Game IIIIIIIIII
1. Find spot to build your base. try to find spot which you need build 3 wall only.
2. Build 4 house and hurry press auto harvester mode. create harvester as many as you can.
3. Build Slayer Tavern and hero.
4. Build Wall and upgrade only 1. the last wall until green wall.
5. Build 2 Healer tower behind wall.
6. Build Sight Seen tower near wall.
7. Build Command Center.
8. Buy gold in Vam Base.
9. from now on you can survive and continue upgrade everything.
10. Don't forget to make killer tower.
hope this tips can make you suvive and avoid feeding vam.
any comment and sugestion can post here .
Hapy Gamming.
Sunday, August 16, 2009
Tower Defend Cheat Maps
Download Tower Defend With cheat . play wisely
register to this blog . hurry
maps:
Green_TD_Unleashed
GREEN TD Pro 9.10 NineVolt
Enjoy!
Saturday, August 1, 2009
Simple way to register account in website
A lot of website need user create account to make access. here is the way to you register account without complecated ways by default web. example if you want to register in www.google.com they may ask many information for you to complete registration. now the easy way to register without mess with many information and keep you profile be secret all over the web.
learn tutorial and try it now for free!
visit http://www.bugmenot.com/ this website can make you register in other website.
learn tutorial and try it now for free!
visit http://www.bugmenot.com/ this website can make you register in other website.
Cara membuat game private ran server.. [GUIDE]
cara ini sih bisa didapet dari forum tetangga. tp kenapa gak kita berbagi.
cara ini dah di implementasikan  di server2 private indo..
baik dari
Xbyte ran online
URo ran online
Jamuran ran online
DLL
Setting up a Ran Online EP 2,3,4,  Private Server
modal awal :

1.) Required Programs
SQL 2005 Express
Install Windows Installer 3.1 Install .NET Framework 2.0 (dotnetfx.exe)
Install MSSQL 2005 Express Edition
Install MSSQL Management Studio Express

2.) Server Files
SQL Script Database
Ep4 Databases.
Pet Database.- PASSWORD: mahalkopdf

Server Files- from Ianotida.- Link Fixed in Mediafire.
or
Server Files-from bk2483
or
Client Files - From ianotida. (working)

 Quote: jika terjadi error sperti dibwah ini
Spoiler
Session Server Connection OK

============================

SessionSndSvrInfo 127.0.0.1 CH:1

(Client ID:0) (127.0.0.1:5103)

INFO:Field Server CH(0) FIELD(0) ID(0) Connection OK

ERROR:CAgentServer::FieldConnect connect CH(0) FIELD(1)

ERROR:CAgentServer::FieldConnect connect CH(0) FIELD(2)

NET_MSG_BASE 1019

=================================================

Server Start OK

=================================================
 , gunakan  field servers. dibwah ini
Field Servers 1, 2, and 3 Mediafire
Field Servers 1, 2, and 3 RapidShare

3.) Server Manager
Download it here

-------------------
4.) Episode 4 Editors
Item Editor(beta)
Quest Editor
Skill Editor

-------------------
5.) GMC editor
Web-Based GMC
Ep6 Tools (Repost)

--------------------
6.) Ep4 Client Links
SkyRaN Client
KinGRaN Client
BabYRaN Client
HerORaN Client

123Ran Splitted Client  bisa juga menggunkan client server lainya
Part 1 - - - 90MB
Part 2 - - - 90MB
Part 3 - - - 90MB
Part 4 - - - 90MB
Part 5 - - - 90MB
Part 6 - - - 90MB
Part 7 - - - 60MB

Full Client Version of 123ran
Mirror 1
Mirror 2

Guide on how to setup.

• Download and install all of the required programs.

• Download the database and also a client to use

• Make a folder for you server files and make sure you also have the
data folder from your client inside the server files folder.

• Download the client patch and replace all the files in the client you
downloaded.

• Change the Ip in your param and cfg.

• Setup your odbc and databases.

• Create an account in; Open MSQL, expand databases, expand RanUser,
expand tables, right click dbo.userinfo and click open table; Make sure
that the password you had put is converted in MD5.

• Run the server and log in and play! (Dont Put md5 pass when u log in in-game
use the string converted of it.

ex. 098F6BCD4621D373CAD = test (enter "test" when loggin in-game)[/quote]Other
Files.
ODBC Setting for SQL 2k5
Download it here.


-------------------
GUI .xml Files
KingRaN Gui
123ran Gui
HeroRan GUI

-------------------
Important Text Files (Decrypted and Translated)
default.charclass
param.txt
crowstrtable.txt
skillstrtable.txt
itemstrtable.txt
maps.txt
comment.txt
-------------------
RanCP - Add-Ons
Register.php Use this to register your account and pass to md5 hash
Note: It wont work unless u run 3 field server with different port.
5103,5****5105

-------------------
Other Tools
Hex Editor , RANFE, DOS Decryptor & Encryptor
Launcher 2.5


-------------------
If you see a bug or something unnessesary in your server, you may base some
solution here and some other in here.
-------------------
Big Thanks to: Pinoy Dev Forum, and to all the members of RaGEZONE Ran
Development.

Ran Ep4 Setup Guide.txt

http://downloads.omegaran.com/randatabase-ep4.zip

tenzuo's database


mirrors:


Databases:
 Quote: Tenzuo's Database < (incomplete pet db) Ianotida's Database  GUI .xml Files   Quote: KingRan Gui HeroRan Gui 123Ran Gui  Important Text Files (Decrypted and Translated)   Quote: Default.chaclass: http://eureka-tambakan.net78.net/ran...t.chaclass.rar

Param.ini and Param.cfg: http://eureka-tambakan.net78.net/ran...am%20(ep4).rar

Crowstrtable.txt: http://eureka-tambakan.net78.net/ran...owstrtable.rar

Skillstrtable.txt: http://eureka-tambakan.net78.net/ran...llstrtable.rar

Itemstrtable.txt: http://eureka-tambakan.net78.net/ran...emstrtable.rar

Maps.txt: http://eureka-tambakan.net78.net/ranep4/maps.rar

Comment.txt: http://eureka-tambakan.net78.net/ranep4/comment.rar  Game.exe +
Glogics= No need to use if you downloaded an client that is modified completely.
 Quote: Rainbow Ran: http://eureka-tambakan.net78.net/ran...nbow%20Ran.rar

Glogic/Quest/NPctalk Fix  [Mix Class Can buy at the NPC] :
http://eureka-tambakan.net78.net/ran...ijnebsky99.rar  ODBC SETUP:
 Quote: how to use?

download > extract it > right click > merge and ur done

still fixing

remember kalau menggunakan XP2 disarankan upgrade ke xp3..
bisa2 terjadi seprti kemarin yang saya kerjakan BSOD.. dikarenakan
net frame work 2.0  terinfeksi malware.. sudah saya coba menggunakan antivirus
ESET nod32,kapersky,pcmav,ansav, tetap tidak terditeksi..

happy make a ran server... cimimiwww

thx to ragezone and all members. for sharing
Tuesday, July 21, 2009
Microsoft Excel 2007 Tutorial Grab It Now!
 This is complete Tutorial for user to learn Microsoft Excel 2007. this tutorial i sell very cheap only $5 / dowanload. 1 dowanload only. No cheating or Scam who buy this tutorial. you can report to pokyehyeh@gmail.com for any problems. 100% working tutorial.
Monday, June 22, 2009
Windows And DOS IP Commands
isplay Connection Configuration: ipconfig /all
Display DNS Cache Info: ipconfig /displaydns
Clear DNS Cache: ipconfig /flushdns
Release All IP Address Connections: ipconfig /release
Renew All IP Address Connections: ipconfig /renew
Re-Register the DNS connections: ipconfig /registerdns
Change/Modify DHCP Class ID: ipconfig /setclassid
Network Connections: control netconnections
Network Setup Wizard: netsetup.cpl
Test Connectivity: ping pokyeh.dnsalias.com
Trace IP address Route: tracert
Displays the TCP/IP protocol sessions: netstat
Display Local Route: route
Display Resolved MAC Addresses: arp
Display Name of Computer Currently on: hostname
Display DHCP Class Information: ipconfig /showclassid
Sunday, June 14, 2009
pokyehyeh ro release beta !!!! catch out
Download patch here. make sure put data replace old data folder and ro client latest version.
Patch Download
dowanload this patch and extract to kro client. this is beta version. everything is free!!
Klik blog adds and donate to improve server
pokyehyeh ro registration website
dowanload this patch and extract to kro client. this is beta version. everything is free!!
Klik blog adds and donate to improve server
pokyehyeh ro registration website
Friday, June 5, 2009
RYL Undergound Return
RYL uderground (private server) come back with new server call RYL Undergound Return.
GM's :
GM-Hex
GM-Underground
GM-Miji
GM-Vor
website:
http://rou.ath.cx/
download client:
http://files.filefront.com/insta ... 9864;/fileinfo.html
download patch v. 817:
http://rapidshare.com/files/2203 ... nderground_v817.exe
Install game, patch in folder
C:\Program Files\CIB\RYL\
enter game and register.
Monday, June 1, 2009
Default password for all TMNet Streamyx supported modem.
ZTE modem
IP Address: 192.168.1.1
Username: ADSL
Password: expert03
Username: ZXDSL
Password: ZXDSL
Username: admin
Password: telekomst
KASDA modem:
IP Address: 192.168.1.1
Username: admin
Password: telekomst
ArtNet modem:
IP Address: 192.168.1.1
Username: admin
Password: telekomst
Username: admin
Password: admin
Username: admin
Password: password
Triz modem:
IP Address: 192.168.1.1
Username: admin
Password: aaaaaaaa
Aztech modem:
IP Address: 10.0.0.2 OR 192.168.1.1
Username: admin
Password: blank
Username: admin
Password: password
Username: admin
Password: admin
Billion modem:
IP Address: 192.168.1.254
Username: admin
Password: password
Huawei modem:
IP Address: 192.168.1.1
Username: admin
Password: admin
Hyundai HSE-220 Modem:
IP Address: 192.168.1.1
Username: ADSL
Password: ADSL
Username: admin
Password: ADSL
Username: root
Password: root
Riger DB102:
IP Address: 192.168.1.1
Username: tmadmin
Password: tmadmin
TP-LINK MODEM / ADSL2 / ROUTER:
IP Address: 192.168.1.1
Username: admin
Password: admin
Friday, May 29, 2009
Release Networking Basic Lesson for beginer!

Get new basic network lesson for beginer.
No other places you can get this lesson.
Wednesday, May 27, 2009
How to Share Printer in Windows XP
How to Share Printer in Windows XP
Follow this step-by-step instructions to share printer in Windows XP.1) Go to Start and click Control Panel. Control Panel Window will appear, then double click Printers and faxes.
2) Printers and Faxes window will appear. Right click the printer you want to share, then click Sharing…

Note: Make sure you've enabled File and Printer Sharing for Microsoft Networks on network card's properties.

3) Select Sharing tab and tick Share this printer to share the printer. You can type in a new name in the Share name text box to change your printer name on the network, however this will not change the printer name on your computer. Click Apply.

Note: If the other users using different version of Windows to access your printer, they will need to install printer driver themselves. You can help by installing additional printer drivers on your Windows XP, so that the printer driver will be installed when other users access the shared printer with different version of Windows. Click Additional Drivers, tick additional driver you would like to install. You will be prompted to install those additional drivers after clicking OK.

4) Once you have shared the printer, you will see there is a hand supporting your printer.
How to Make a USB Pen Drive Bootable
How to Make a USB Pen Drive Bootable
The Guide is based on creating/getting a USB Pen Drive to boot on the DFI NF4 series mobo. The second part shows how to flash your bios from the pen drive.
Part 1
1. The easiest way to do this is with a floppy drive, if you don't have one, there is an alternative method at the bottom of the guide.
2. For XP users insert a blank floppy disc into the drive, open My Computer and right click on your floppy drive and choose "Format" from the popup.
3. Make sure the 'create a bootable system disk' option is checked. This will add the system files needed by the USB drive from the floppy. Click 'OK' to format the disk.

4. HP are constantly changing this utility, and as such the version you download might differ from the one in the guide HP Drive Key Boot Utility V2.1.8. Its intended obviously for HP usb drives but works fine with most other usb drives.
5. Plug in your USB drive and run the HP USB disk storage tool.
6. Ensure that the tool has found the correct drive in the "Device" box. Change the "File System" to "FAT". Check the "Create a DOS startup disk" option, and in the "using DOS system files located at:" window, enter "A:\" to point the program to your floppy disk or browse to it. Now click 'Start'. The program will create the necessary boot files on the USB drive.

7. Reboot your pc, when you see the post screen hit the Escape key, this will bring up a Boot Menu screen. Choose your USB drive from the list and hit Enter.

8. If all has went well you should have rebooted to the C:\ prompt. Congratulations you have just made a Bootable USB pen drive.
Alternative Method for users with no Floppy drives For users without a floppy drive download the XP Custom Boot disc HERE. This is a .exe file that contains all of the system files that you will need. Extract the files to a folder using Winimage etc. In Step 6. Point the HP USB utility to the folder containing the XP Custom Boot files.
Notes: Some USB pen drives do NOT work, mp3 type pen drives don't work or at least the ones i have tried do not, only a dedicated pen drive should be used. The Corsair Flash Voyager USB Pen Drive work perfect.
The Guide is based on creating/getting a USB Pen Drive to boot on the DFI NF4 series mobo. The second part shows how to flash your bios from the pen drive.
Part 1
1. The easiest way to do this is with a floppy drive, if you don't have one, there is an alternative method at the bottom of the guide.
2. For XP users insert a blank floppy disc into the drive, open My Computer and right click on your floppy drive and choose "Format" from the popup.
3. Make sure the 'create a bootable system disk' option is checked. This will add the system files needed by the USB drive from the floppy. Click 'OK' to format the disk.
4. HP are constantly changing this utility, and as such the version you download might differ from the one in the guide HP Drive Key Boot Utility V2.1.8. Its intended obviously for HP usb drives but works fine with most other usb drives.
5. Plug in your USB drive and run the HP USB disk storage tool.
6. Ensure that the tool has found the correct drive in the "Device" box. Change the "File System" to "FAT". Check the "Create a DOS startup disk" option, and in the "using DOS system files located at:" window, enter "A:\" to point the program to your floppy disk or browse to it. Now click 'Start'. The program will create the necessary boot files on the USB drive.
7. Reboot your pc, when you see the post screen hit the Escape key, this will bring up a Boot Menu screen. Choose your USB drive from the list and hit Enter.
8. If all has went well you should have rebooted to the C:\ prompt. Congratulations you have just made a Bootable USB pen drive.
Alternative Method for users with no Floppy drives For users without a floppy drive download the XP Custom Boot disc HERE. This is a .exe file that contains all of the system files that you will need. Extract the files to a folder using Winimage etc. In Step 6. Point the HP USB utility to the folder containing the XP Custom Boot files.
Notes: Some USB pen drives do NOT work, mp3 type pen drives don't work or at least the ones i have tried do not, only a dedicated pen drive should be used. The Corsair Flash Voyager USB Pen Drive work perfect.
vista - Change TCP/IP settings
Change TCP/IP settings on Vista
TCP/IP defines the language that your computer uses to communicate with other computers. We recommend using automated Dynamic Host Configuration Protocol (DHCP) to automatically assign Internet Protocol (IP) addresses to the computers on your network, if your network supports it. If you use DHCP, then you don't have to change your settings if you move your computer to another location, and DHCP doesn't require you to manually configure settings such as Domain Name System (DNS) and Windows Internet Name Service (WINS).
|
EOP 10 GAMES !!! CATCH OUT
| Rank | Title and Description | In | Out |
| 1 | 1080| | 283 | |
| |  Started in 1989, Avalon is the first of its kind. Much imitated, never beaten. It is not a game. It is a life, of dragons, sorcerers, shopkeepers, great cities, wars, princes and gods. Yet only a few rise to become gods themselves. Will you be the next? Avalon is the finest of all online RPG games. | MUDS Previous Online RPG Games Rank: 1 | |
| 2 | 1059| | 544 | |
| | The Star Wars Combine is a free online player-based simulation revolving around the Star Wars universe. Online RPG games genre. | MMORPG Previous Online RPG Games Rank: 3 | |
| 3 | 966| | 222 | |
| | Free web based mafia game, multiplayer, with over 20,000 members. | MMORPG Previous Online RPG Games Rank: 2 | |
| 4 | 695| | 136 | |
| | We are now live! Do you think you have what it takes to take your clan to the top? Are you the best fighter in the land? Think you can amass the biggest fortune? Want to spend some time with mature players over the age of 18? Come join us. | MMORPG Previous Online RPG Games Rank: 4 | |
| 5 | 581| | 316 | |
| | A free fun web based Mafia Crime game. As a Mobster your aim is to work your way to the top, whether by yourself or with the help of your gang. Attack and mug people to gain more money and respect, gamble, deal in weapons and armour. Be a true mobster! | MMORPG Previous Online RPG Games Rank: 5 | |
| 6 | 198| | 95 | |
| | Started in 2006. Since then, it has been through many testing phases and improvment stages to become one of the best MMORPG's today. The aim of the game is to compete for dominance over all other members. | MMORPGs Previous Online RPG Games Rank: 7 | |
| 7 | 171| | 77 | |
| | Vampire themed text based RPG | MMORPGs Previous Online RPG Games Rank: 6 | |
| 8 | 121| | 36 | |
| | Sign up today to become a mobster working your way through the ranks to become the greatest and most powerful gangster in the Mafioso world | MMORPG Previous Online RPG Games Rank: 24 | |
| 9 | 103| | 44 | |
| | Online Mafia World. Online RPG games play. | Browser Based Previous Online RPG Games Rank: 8 | |
| 10 | 102| | 66 | |
| | Looking for a fun and interesting game full of mobsters? Try The Mafia Syndicate, Where you can train your stats, Level, Join gangs, Make friends. | MMORPG Previous Online RPG Games Rank: 10 | |
How To Make Internet Connection - Vista
Vista Internet Connetion - Vista
The first time you create a dial-up connection, you will be prompted for location information. It is important to specify the correct country, and dialing information. The standards for telephone operation differ in various countries. Incorrect country selection may prevent the modem from functioning properly - including dial-tone and call-progress detection. You can reach the screen to create a connection from Start -> Connect To (and click on "Set up a connection or network"), or from Control Panel -> Network and Sharing Center (and click on "Set up a connection or network").
| After you have set the location, you can change and edit it with the Phone & Modem options in Control Panel. You can also create New locations. (Helpful if you have a mobile computer that you use in various locations.) | 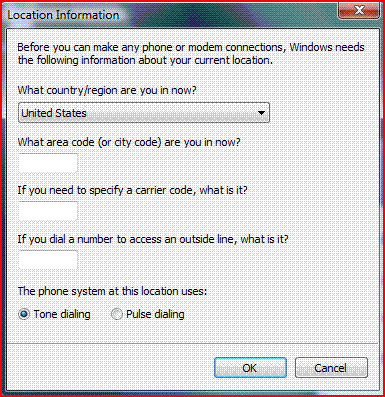 |
| To create a new connection, click on "Set up a dial-up connection" |  |
| Enter the Phone Number (the dialing rules link is important as it will determine whether the number you put in here is actually dialed, or whether modifiers like 1 or area code, or outside line digits are added). You may enter your username and password, or, you can leave them blank and you'll be prompted for them when you attempt to make a connection. You can put a descriptive name in the "Connection name" box. If you check the "allow other people..." box, the connection will be available to all users of your computer; if you leave it unchecked, only your username will have access to it. | 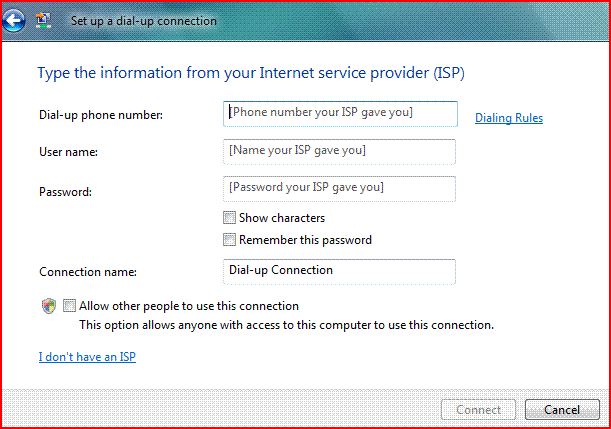 |
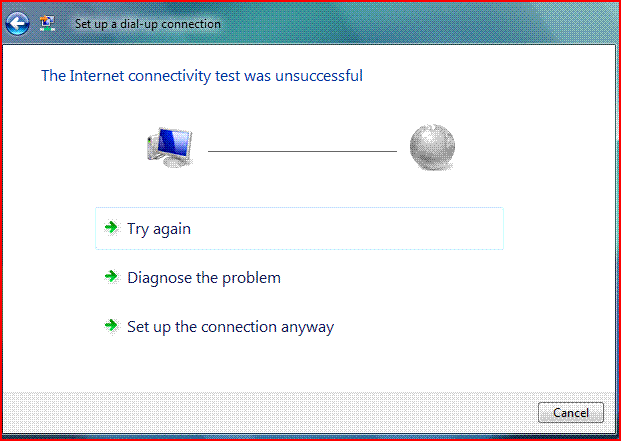
After you have entered a phone number in the "Set up a dial up connection" window as shown above, the "Connect" button becomes clickable. There is no "Save" button - only "Connect" and "Cancel". You must click on "Connect" to save the connection, which will start an attempt to make a connection using the username and password (if any) you entered. This dialog will have a "Skip" button which you can use to skip the connection test. If the connect test fails, you will be shown a window similar to below:
If you select "Try again", Windows will make another attempt to dial the ISP and connect. If you select "Diagnose the problem" you will be presented with a window that says there is no problem. (Apparently, Windows Vista is unable to diagnose any dial-up problems at all - every test I have made results in the problem being diagnosed as no problem.) Or, you can select "Set up the connection anyway", or click "Cancel" which will abort the attempt to set up a dial-up connection.
Once the connection has been set up, you can use it, or edit it.
Saturday, May 2, 2009
Makcik Bibah - How can I disable the User Account Control (UAC) feature on my Windows Vista computer?
Method #1 - Using MSCONFIG
- Launch MSCONFIG by from the Run menu.
- Click on the Tools tab. Scroll down till you find "Disable UAC" . Click on that line.

- Press the Launch button.
- A CMD window will open. When the command is done, you can close the window.
- Close MSCONFIG. You need to reboot the computer for changes to apply.
You can re-enable UAC by selecting the "Enable UAC" line and then clicking on the Launch button.
*Recommended: Speed up Vista boot times by reducing the number of programs that load at startup. Control your Vista startup list with this Vista app
Method #2 - Using Regedit
- Open Registry Editor.
- In Registry Editor, navigate to the following registry key:
HKEY_LOCAL_MACHINE'Software'Microsoft'Windows'CurrentVersion'Policies'System - Locate the following value (DWORD): EnableLUA and give it a value of 0.

- Close Registry Editor. You need to reboot the computer for changes to apply.
Note: As always, before making changes to your registry you should always make sure you have a valid backup. In cases where you're supposed to delete or modify keys or values from the registry it is possible to first export that key or value(s) to a .REG file before performing the changes.
In order to re-enable UAC just change the above value to 1.
Method #3 - Using Group Policy
This can be done via Local Group Policy or via Active Directory-based GPO, which is much more suited for large networks where one would like to disable UAC for many computers at once.
If using Local Group Policy you'll need to open the Group Policy Editor (Start > Run > gpedit.msc) from your Vista computer.
If using in AD-based GPO, open Group Policy Management Console (Start > Run > gpmc.msc) from a Vista computer that is a member of the domain. In the GPMC window, browse to the required GPO that is linked to the OU or domain where the Vista computers are located, then edit it.
- In the Group Policy Editor window, browse to Computer Configuration > Windows Settings > Security Settings > Local Policies > Security Options.

- In the right pane scroll to find the User Access Control policies (they're down at the bottom of the window). You need to configure the following policies:

- You'll need to reboot your computers.
Method #4 - Using Control Panel
- Open Control Panel.
- Under User Account and Family settings click on the "Add or remove user account".

- Click on one of the user accounts, for example you can use the Guest account.
- Under the user account click on the "Go to the main User Account page" link.

- Under "Make changes to your user account" click on the "Change security settings" link.

- In the "Turn on User Account Control (UAC) to make your computer more secure" click to unselect the "Use User Account Control (UAC) to help protect your computer". Click on the Ok button.

- You will be prompted to reboot your computer. Do so when ready.

In order to re-enable UAC just select the above checkbox and reboot.
Thursday, April 30, 2009
device drivers backup, restoration, update and removal
Driver Magician offers a professional solution for device drivers backup, restoration, update and removal in Windows operating system. It identifies all the hardware in the system, extracts their associated drivers from the hard disk and backs them up to a location of your choice. Then when you format and reinstall/upgrade your operating system, you can restore all the "saved" drivers just as if you had the original driver diskettes in your hands. After one system reboot, your PC will be loaded and running with the required hardware drivers.
What's more, Driver Magician has a built in database of the latest drivers with the ability to go to the Internet to receive the driver updates. It saves lots of time to find the correct drivers and mature drivers will obviously increase the performance of hardware. If there are unknown devices in your PC, Driver Magician helps you detect them easily and quickly with its built in hardware identifier database.
Key features:
- Back up device drivers of your computer in four modes.
- Restore device drivers from backup in one mouse click.
- Update device drivers of your PC to improve system performance and stability.
- Uninstall device drivers
- Live Update device identifier database and driver update database.
- Detect unknown devices.
- Back up more items such as My Documents and Registry.
- Restore more items from backup.
- Get detailed information of the hardware drivers.
- Clone all drivers to an auto-setup package (.EXE), so you can restore drivers without installing Driver Magician.
- dd more restoration options. You can restore driver from a compressed file, from a self-extractor or from an auto-setup package. If drivers are backed up in an auto-setup package, you can restore driver like installing software and without installing Driver Magician firstly.
- System Requirement:
- Pentium 166MHz
- Windows© 98/ME/2000/XP/Server 2003/Vista/x64
- 32 MB of available RAM (64 MB recommended) plus 10 MB of available disk space for installa
Thursday, April 23, 2009
How To Download And Save Youtube Videos
Simple step to download movies from youtube.com

3. paste url in youtube downloader.
4. select where you wan save download.
5. that all.
- Download Youtube downloader. from http://www.pokyehyeh.site90.net
- Copy url from youtube.com

3. paste url in youtube downloader.

4. select where you wan save download.
5. that all.
Wednesday, April 22, 2009
Windows Server 2008 activation removal
Ok How Active Windows Server 2008 ?

Super Simple!!!

1║ Install Windows Server 2008 [ Any Version ].
2║ Click START / RUN / type SERVICES.
3║ Double click on SOFTWARE LICENSING on sturtup type choose DISABLED.
4║ Restart Computer.
5║ Go to: C:WindowsServiceProfilesNetworkServiceAppDataRoamingMicrosoftSoftwareLicensing
6║ DELETE the Tokens.dat and put this:  http://www.mediamax.com/angelofdeath6488/Hosted/tokens.dat
7║ Go again do SERVICES. Double click on SOFTWARE LICENSING on sturtup type choose AUTOMATIC.
8║ Use the vistaactivation.exe , Activate like you have a Windows Vista ULTIMATE. Forget the ERROR┤s , No Problem it┤s normal that errors.
8║ RESTART Computer.
9║ The Windows Server 2008 Start and ask for a Serial Key , Use This: 6F2D7-2PCG6-YQQTB-FWK9V-932CC
10║ Windows Server 2008 is Activated :) i realy install the upgrades and works 100%.


Tokens.dat + Serial + vistaactivation.exe

download torrent sor use this exe - http://thepiratebay.org/torrent/4141231/Windows_Server_2008_activation.4141231.TPB.torrent
Saturday, April 18, 2009
Create Ghost Bootup with Network
This trick shows you how create Symantec Ghost bootup floppy disks with Network option. With the network option, you can access the network resources and use the GhostCast feature to perform backup/restore via the network. The instructions based on Ghost 8, but similar procedures can be done on different versions of Ghost.
If you're looking for the instructions how to create a standard Symantec Ghost Bootup (i.e. without Network), click Here instead.
Or if you're looking for the instructions how to create a Ghost Bootup CD from the two floppy disks, click Here instead.
Use this trick at your own risk.
If you're looking for the instructions how to create a standard Symantec Ghost Bootup (i.e. without Network), click Here instead.
Or if you're looking for the instructions how to create a Ghost Bootup CD from the two floppy disks, click Here instead.
Use this trick at your own risk.
- Open the "Symantec Ghost Boot Wizard".

- Select "Network Boot Disk" and click "Next".

- At the screen "Symantec Ghost Boot Wizard - Network Interface Card", select an appropriate driver for your network card. If you need more details on a driver, click on it and select "Modify".
If you don't see your network card listed, follow the next step to add a new one; otherwise, select your network card and click "Next" (and skip to step 9).

- To add a new driver, search and download your driver from the internet. Make sure you download a "DOS" driver. A "Packet Driver" usually comes with a ".COM" file or ".EXE" file. A "NDIS2 driver" usually comes with a ".DOS" file.
- Click "Add" on the screen "Symantec Ghost Boot Wizard - Network Interface Card" to bring up the "Template Type" dialog.
Select "NDIS2 driver" or "Packet Driver" depending on what you have. (You probably have more luck searching a "NDIS2 driver" - file with ".DOS") then click "OK".

- At the screen "Template Properties", click on the "Browse..." button and browse to your driver. Then enter a name for "Driver Name". A driver name should be very simple and must end with a "$". For example, you can take the first few letter of your driver file and add the "$":

- Click "OK" to go back to the screen "Symantec Ghost Boot Wizard - Network Interface Card"
- The "Name" field of the new driver should be editable. Go ahead to change this name the way you want. This name is just to help you recognize it from the list. Then click "Next".

- Click "Next" on the next screen to "Use PC-DOS".
- On the next screen, you'll need to specify where the file "ghost.exe" is located. This file is normally installed to a path as example below, but you should double check. Then click "Next".

- Click "Next" on the next screen to use default options for external storage devices.
- On the next screen, you'll need to specify the Tcp/ip options. The Tcp/ip can be either "Automatic IP" (or "DHCP"), or "Static IP".
If you plan to run Ghost on multiples computer on a same network at a same time (using GhostCast), you should specify a static IP for each CD to avoid conflicting. Otherwise, you can always select "DHCP will assign the IP settings". Then click "Next".

- Click "Next" on the next screen:

- Click "Next" on the Review screen:

- A message will display telling you that you will need two floppy disks. Click "OK".
- The Boot Disk Wizard will start to erase your floppy and create the boot data. Once it's done with the first disk, it will prompt for a second one.
Friday, April 17, 2009
How to find RAM type without opening computer?
CPU-Z is the best program you can download. with this software your can identify your RAM type without open computer. try search software name CPU-Z in www.google.com or www.pokyehyeh.site90.net do direct download(if still in my folder).
but got some other softwere can identify all the hardware and your hardware driver in your computer without open computers. if your want this software. you can leave your message in my website or this blog. i will send via emails.
but got some other softwere can identify all the hardware and your hardware driver in your computer without open computers. if your want this software. you can leave your message in my website or this blog. i will send via emails.
Thursday, April 16, 2009
How to Partition and format an extra Hard drive
First, you need to locate the device manager. You will find it by doing the steps listed below:
1. Click on Start
2. Click on Control Panel
3. Click on Administrative Tools
4. Click on computer management
Second, In the left column you will find a set of computer management tools. You will need to click on Disk Management. The disk management lists all of the hard drive on your computer, the Type, File system, Status, capacity and available free space.
Third, You need to locate the drive you wish to format. For example:
Let's use Drive (C:)
Drive C: is usually the main drive of any computer, however you can rename it and change it's path, but I do recommend leaving it at C: as most programs are set to install into that directory and may not work in any other directory.
Fourth, If the hard drive
Once partitioned, right click again and choose "Format" This will format the drive so that all of the partitioned space can be used as a primary drive to add programs onto.
Fifth , If this is a drive that is already workable and you just desire to have it reformatted, you can right click on it and choose "reformat", that way the drive is reformatted using the current space on the drive.
more windows xp tip and customise
windows keyboard short cut
General keyboard shortcuts
* CTRL+C (Copy)
* CTRL+X (Cut)
* CTRL+V (Paste)
* CTRL+Z (Undo)
* DELETE (Delete)
* SHIFT+DELETE (Delete the selected item permanently without placing the item in the Recycle Bin)
* CTRL while dragging an item (Copy the selected item)
* CTRL+SHIFT while dragging an item (Create a shortcut to the selected item)
* F2 key (Rename the selected item)
* CTRL+RIGHT ARROW (Move the insertion point to the beginning of the next word)
* CTRL+LEFT ARROW (Move the insertion point to the beginning of the previous word)
* CTRL+DOWN ARROW (Move the insertion point to the beginning of the next paragraph)
* CTRL+UP ARROW (Move the insertion point to the beginning of the previous paragraph)
* CTRL+SHIFT with any of the arrow keys (Highlight a block of text)
* SHIFT with any of the arrow keys (Select more than one item in a window or on the desktop, or select text in a document)
* CTRL+A (Select all)
* F3 key (Search for a file or a folder)
* ALT+ENTER (View the properties for the selected item)
* ALT+F4 (Close the active item, or quit the active program)
* ALT+ENTER (Display the properties of the selected object)
* ALT+SPACEBAR (Open the shortcut menu for the active window)
* CTRL+F4 (Close the active document in programs that enable you to have multiple documents open simultaneously)
* ALT+TAB (Switch between the open items)
* ALT+ESC (Cycle through items in the order that they had been opened)
* F6 key (Cycle through the screen elements in a window or on the desktop)
* F4 key (Display the Address bar list in My Computer or Windows Explorer)
* SHIFT+F10 (Display the shortcut menu for the selected item)
* ALT+SPACEBAR (Display the System menu for the active window)
* CTRL+ESC (Display the Start menu)
* ALT+Underlined letter in a menu name (Display the corresponding menu)
* Underlined letter in a command name on an open menu (Perform the corresponding command)
* F10 key (Activate the menu bar in the active program)
* RIGHT ARROW (Open the next menu to the right, or open a submenu)
* LEFT ARROW (Open the next menu to the left, or close a submenu)
* F5 key (Update the active window)
* BACKSPACE (View the folder one level up in My Computer or Windows Explorer)
* ESC (Cancel the current task)
* SHIFT when you insert a CD-ROM into the CD-ROM drive (Prevent the CD-ROM from automatically playing)
* CTRL+SHIFT+ESC (Open Task Manager)
Back to the top
Dialog box keyboard shortcuts
If you press SHIFT+F8 in extended selection list boxes, you enable extended selection mode. In this mode, you can use an arrow key to move a cursor without changing the selection. You can press CTRL+SPACEBAR or SHIFT+SPACEBAR to adjust the selection. To cancel extended selection mode, press SHIFT+F8 again. Extended selection mode cancels itself when you move the focus to another control.
* CTRL+TAB (Move forward through the tabs)
* CTRL+SHIFT+TAB (Move backward through the tabs)
* TAB (Move forward through the options)
* SHIFT+TAB (Move backward through the options)
* ALT+Underlined letter (Perform the corresponding command or select the corresponding option)
* ENTER (Perform the command for the active option or button)
* SPACEBAR (Select or clear the check box if the active option is a check box)
* Arrow keys (Select a button if the active option is a group of option buttons)
* F1 key (Display Help)
* F4 key (Display the items in the active list)
* BACKSPACE (Open a folder one level up if a folder is selected in the Save As or Open dialog box)
Back to the top
Microsoft natural keyboard shortcuts
* Windows Logo (Display or hide the Start menu)
* Windows Logo+BREAK (Display the System Properties dialog box)
* Windows Logo+D (Display the desktop)
* Windows Logo+M (Minimize all of the windows)
* Windows Logo+SHIFT+M (Restore the minimized windows)
* Windows Logo+E (Open My Computer)
* Windows Logo+F (Search for a file or a folder)
* CTRL+Windows Logo+F (Search for computers)
* Windows Logo+F1 (Display Windows Help)
* Windows Logo+ L (Lock the keyboard)
* Windows Logo+R (Open the Run dialog box)
* Windows Logo+U (Open Utility Manager)
Back to the top
Accessibility keyboard shortcuts
* Right SHIFT for eight seconds (Switch FilterKeys either on or off)
* Left ALT+left SHIFT+PRINT SCREEN (Switch High Contrast either on or off)
* Left ALT+left SHIFT+NUM LOCK (Switch the MouseKeys either on or off)
* SHIFT five times (Switch the StickyKeys either on or off)
* NUM LOCK for five seconds (Switch the ToggleKeys either on or off)
* Windows Logo +U (Open Utility Manager)
Back to the top
Windows Explorer keyboard shortcuts
* END (Display the bottom of the active window)
* HOME (Display the top of the active window)
* NUM LOCK+Asterisk sign (*) (Display all of the subfolders that are under the selected folder)
* NUM LOCK+Plus sign (+) (Display the contents of the selected folder)
* NUM LOCK+Minus sign (-) (Collapse the selected folder)
* LEFT ARROW (Collapse the current selection if it is expanded, or select the parent folder)
* RIGHT ARROW (Display the current selection if it is collapsed, or select the first subfolder)
Back to the top
Shortcut keys for Character Map
After you double-click a character on the grid of characters, you can move through the grid by using the keyboard shortcuts:
* RIGHT ARROW (Move to the right or to the beginning of the next line)
* LEFT ARROW (Move to the left or to the end of the previous line)
* UP ARROW (Move up one row)
* DOWN ARROW (Move down one row)
* PAGE UP (Move up one screen at a time)
* PAGE DOWN (Move down one screen at a time)
* HOME (Move to the beginning of the line)
* END (Move to the end of the line)
* CTRL+HOME (Move to the first character)
* CTRL+END (Move to the last character)
* SPACEBAR (Switch between Enlarged and Normal mode when a character is selected)
Back to the top
Microsoft Management Console (MMC) main window keyboard shortcuts
* CTRL+O (Open a saved console)
* CTRL+N (Open a new console)
* CTRL+S (Save the open console)
* CTRL+M (Add or remove a console item)
* CTRL+W (Open a new window)
* F5 key (Update the content of all console windows)
* ALT+SPACEBAR (Display the MMC window menu)
* ALT+F4 (Close the console)
* ALT+A (Display the Action menu)
* ALT+V (Display the View menu)
* ALT+F (Display the File menu)
* ALT+O (Display the Favorites menu)
Back to the top
MMC console window keyboard shortcuts
* CTRL+P (Print the current page or active pane)
* ALT+Minus sign (-) (Display the window menu for the active console window)
* SHIFT+F10 (Display the Action shortcut menu for the selected item)
* F1 key (Open the Help topic, if any, for the selected item)
* F5 key (Update the content of all console windows)
* CTRL+F10 (Maximize the active console window)
* CTRL+F5 (Restore the active console window)
* ALT+ENTER (Display the Properties dialog box, if any, for the selected item)
* F2 key (Rename the selected item)
* CTRL+F4 (Close the active console window. When a console has only one console window, this shortcut closes the console)
Back to the top
Remote desktop connection navigation
* CTRL+ALT+END (Open the Microsoft Windows NT Security dialog box)
* ALT+PAGE UP (Switch between programs from left to right)
* ALT+PAGE DOWN (Switch between programs from right to left)
* ALT+INSERT (Cycle through the programs in most recently used order)
* ALT+HOME (Display the Start menu)
* CTRL+ALT+BREAK (Switch the client computer between a window and a full screen)
* ALT+DELETE (Display the Windows menu)
* CTRL+ALT+Minus sign (-) (Place a snapshot of the entire client window area on the Terminal server clipboard and provide the same functionality as pressing ALT+PRINT SCREEN on a local computer.)
* CTRL+ALT+Plus sign (+) (Place a snapshot of the active window in the client on the Terminal server clipboard and provide the same functionality as pressing PRINT SCREEN on a local computer.)
Back to the top
Microsoft Internet Explorer navigation
* CTRL+B (Open the Organize Favorites dialog box)
* CTRL+E (Open the Search bar)
* CTRL+F (Start the Find utility)
* CTRL+H (Open the History bar)
* CTRL+I (Open the Favorites bar)
* CTRL+L (Open the Open dialog box)
* CTRL+N (Start another instance of the browser with the same Web address)
* CTRL+O (Open the Open dialog box, the same as CTRL+L)
* CTRL+P (Open the Print dialog box)
* CTRL+R (Update the current Web page)
* CTRL+W (Close the current window)
Back to the top
Other information
* Some keyboard shortcuts may not work if StickyKeys is turned on in Accessibility Options.
* Some of the Terminal Services client shortcuts that are similar to the shortcuts in Remote Desktop Sharing are not available when you use Remote Assistance in Windows XP Home Edition.
* Some of the other Microsoft Knowledge Base articles that have similar information as this article are:
126449 (http://support.microsoft.com/kb/126449/ ) Keyboard shortcuts for Windows
255090 (http://support.microsoft.com/kb/255090/ ) Keystroke navigation in Windows 2000 Help
Wednesday, April 15, 2009
RED ALERT
RED ALERT 2
RED ALERT 3
warcraft 3 download
EMPIRE EARTH download
ANNO 1707 download
ANNO 1404 download
WEB MELAYU BOLEH download
MALAY 3GP download
DOTA NEW MAPS download
MAX PYNE 3 download
BATTLE TANK download
TOURISM MALAYSIA download
MAPS download
WORLD MAPS download
RED ALERT 2
RED ALERT 2
RED ALERT 2
RED ALERT 2
RED ALERT 2
RED ALERT 2
RED ALERT 2 RED ALERT 2
RED ALERT 2
RED ALERT 2
RED ALERT 3
warcraft 3 download
EMPIRE EARTH download
ANNO 1707 download
ANNO 1404 download
WEB MELAYU BOLEH download
MALAY 3GP download
DOTA NEW MAPS download
MAX PYNE 3 download
BATTLE TANK download
TOURISM MALAYSIA download
MAPS download
WORLD MAPS download
RED ALERT 2
RED ALERT 2
RED ALERT 2
RED ALERT 2
RED ALERT 2
RED ALERT 2
RED ALERT 2 RED ALERT 2
RED ALERT 2
Subscribe to:
Comments (Atom)